您好,欢迎访问三七文档
当前位置:首页 > 建筑/环境 > 工程监理 > 上机1基于WinPcap的网络嗅探器设计与实现
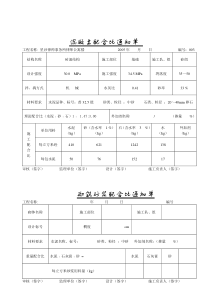
上机1:基于WinPcap的网络嗅探器设计1、目的与要求掌握基于WinPcap的网络编程模式。理解并能应用WinPcap设计并实现网络数据包的捕获与解析。2、设备与上机环境连网PC机(至少一台)。计算机硬件要求:IntelPentium5处理器、256MB以上内存,Ethernet网卡,网线若干。计算机软件要求:MSWindows9x/2000/XP操作系统,TCP/IP协议,WinPcap430,Visualc++6.0/.net系统。3、上机内容与步骤:在程序设计之前,请参照提供的软件安装WinPcap。之后,按照如下步骤操作:步骤1:在VC++6.0下创建一个DOS命令行程序,工程名:自己的学号-PacketDump步骤2:打开main()函数,在主程序中增加如下头文件和常量定义:pcap_if_t*alldevs,*d;pcap_t*fp;u_intinum,i=0;charerrbuf[PCAP_ERRBUF_SIZE];intres;structpcap_pkthdr*header;constu_char*pkt_data;printf(pktdump_ex:printsthepacketsofthenetworkusingWinPcap.\n);printf(Usage:pktdump_ex[-ssource]\n\nExamples:\npktdump_ex-sfile.acp\npktdump_ex-s\\Device\\NPF_{C8736017-F3C3-4373-94AC-9A34B7DAD998}\n\n);if(argc3){#includepcap.h#defineLINE_LEN16printf(\nNoadapterselected:printingthedevicelist:\n);/*Theuserdidn'tprovideapacketsource:Retrievethelocaldevicelist*/if(pcap_findalldevs(&alldevs,errbuf)==-1){fprintf(stderr,Errorinpcap_findalldevs_ex:%s\n,errbuf);exit(1);}/*Printthelist*/for(d=alldevs;d;d=d-next){printf(%d.%s\n,++i,d-name);if(d-description)printf((%s)\n,d-description);elseprintf((Nodescriptionavailable)\n);}if(i==0){printf(\nNointerfacesfound!MakesureWinPcapisinstalled.\n);return-1;}printf(Entertheinterfacenumber(1-%d):,i);scanf(%d,&inum);if(inum1||inumi){printf(\nInterfacenumberoutofrange.\n);/*Freethedevicelist*/pcap_freealldevs(alldevs);return-1;}/*Jumptotheselectedadapter*/for(d=alldevs,i=0;iinum-1;d=d-next,i++);/*Opentheadapter*/if((fp=pcap_open_live(d-name,//nameofthedevice65536,//portionofthepackettocapture.//65536grantsthatthewholepacketwillbecapturedonalltheMACs.1,//promiscuousmode(nonzeromeanspromiscuous)1000,//readtimeouterrbuf//errorbuffer))==NULL){fprintf(stderr,\nErroropeningadapter\n);return-1;}}else{/*Donotcheckfortheswitchtype('-s')*/if((fp=pcap_open_live(argv[2],//nameofthedevice65536,//portionofthepackettocapture.//65536grantsthatthewholepacketwillbecapturedonalltheMACs.1,//promiscuousmode(nonzeromeanspromiscuous)1000,//readtimeouterrbuf//errorbuffer))==NULL){fprintf(stderr,\nErroropeningadapter\n);return-1;}}/*Readthepackets*/while((res=pcap_next_ex(fp,&header,&pkt_data))=0){if(res==0)/*Timeoutelapsed*/continue;/*printpkttimestampandpktlen*/printf(%ld:%ld(%ld)\n,header-ts.tv_sec,header-ts.tv_usec,header-len);/*Printthepacket*/for(i=1;(iheader-caplen+1);i++){printf(%.2x,pkt_data[i-1]);if((i%LINE_LEN)==0)printf(\n);}printf(\n\n);}if(res==-1){printf(Errorreadingthepackets:%s\n,pcap_geterr(fp));return-1;}pcap_close(fp);return0;步骤3:为编译器指定包含文件和库文件搜索目录。假定WinPcap开发包WpdPack_4_0_2.zip被解压缩到C盘,如下图:为编译器指定包含文件和库文件搜索目录的方法如下:在VC++6.0下,打开Tools菜单,选择Options,然后选择Directories选项卡,指定WinPcap包含文件和库文件目录,如下图所示。步骤4:指定链接的库文件。方法:打开Project菜单,选择Settings,选择Link选项卡,然后把wpcap.lib、ws2_32.lib添加到Object/Librarymodules下的文本框中,如下图所示。步骤5:将工程文件存盘、编译即可本程序是命令行程序,因此必须在DOS窗口下运行测试。打开DOS窗口,在Debug目录下找到编译后的可执行文件,输入可执行文件名回车即可。
 三七文档所有资源均是用户自行上传分享,仅供网友学习交流,未经上传用户书面授权,请勿作他用。
 扫描二维码
扫描二维码


 ansonsammy100
本文标题:上机1基于WinPcap的网络嗅探器设计与实现
链接地址:https://www.777doc.com/doc-2809236 .html